

It’s been a hot minute since I’ve done any FDM printing. Most recently I’ve been doing a lot of resin prints, thanks to machines like the ELEGOO Saturn 2 which came out earlier this summer. So I was pretty excited when ELEGOO sent me their latest printer, the Neptune 3 Pro.
SLA vs FDM: The Two Types of 3D Printing
Briefly, for our readers who aren’t that familiar with 3D printers but are thinking about dipping their toes in the water:
There are essentially two types of printers available, stereolithographic (SLA) and fused deposition modeling (FDM). FDM models use a heated filament (most frequently PLA plastic) to build up a model, adding layer after layer until the model is complete. SLA printers use light to solidify a layer of resin at a time, creating the model. In the case of the Neptune 3 Pro, it is a fused deposition modeling printer.
Both types of printers use their own type of “slicer” software to prepare a 3D model for printing, allowing you to adjust for the type of material you’re printing, how much detail you want to put into the final product (the finer the detail, the longer it takes to print), and if you need to add any “supports” into the model to help ensure that the model doesn’t break or deform during the printing the process.
If you’re new to 3D printing, this can all seem a bit overwhelming. Don’t worry, I’ll be explaining more as I describe my experiences with the Neptune 3 Pro. In the meantime, think about it this way: SLA printers like the Mars 3 and Saturn 2 are best if you want to print smoother, more detailed figures such as tabletop miniatures for Dungeons & Dragons, while FDM printers excel at printing larger, less detailed parts and objects, such as cosplay armor pieces and weapons.
What Is the ELEGOO Neptune 3 Pro?
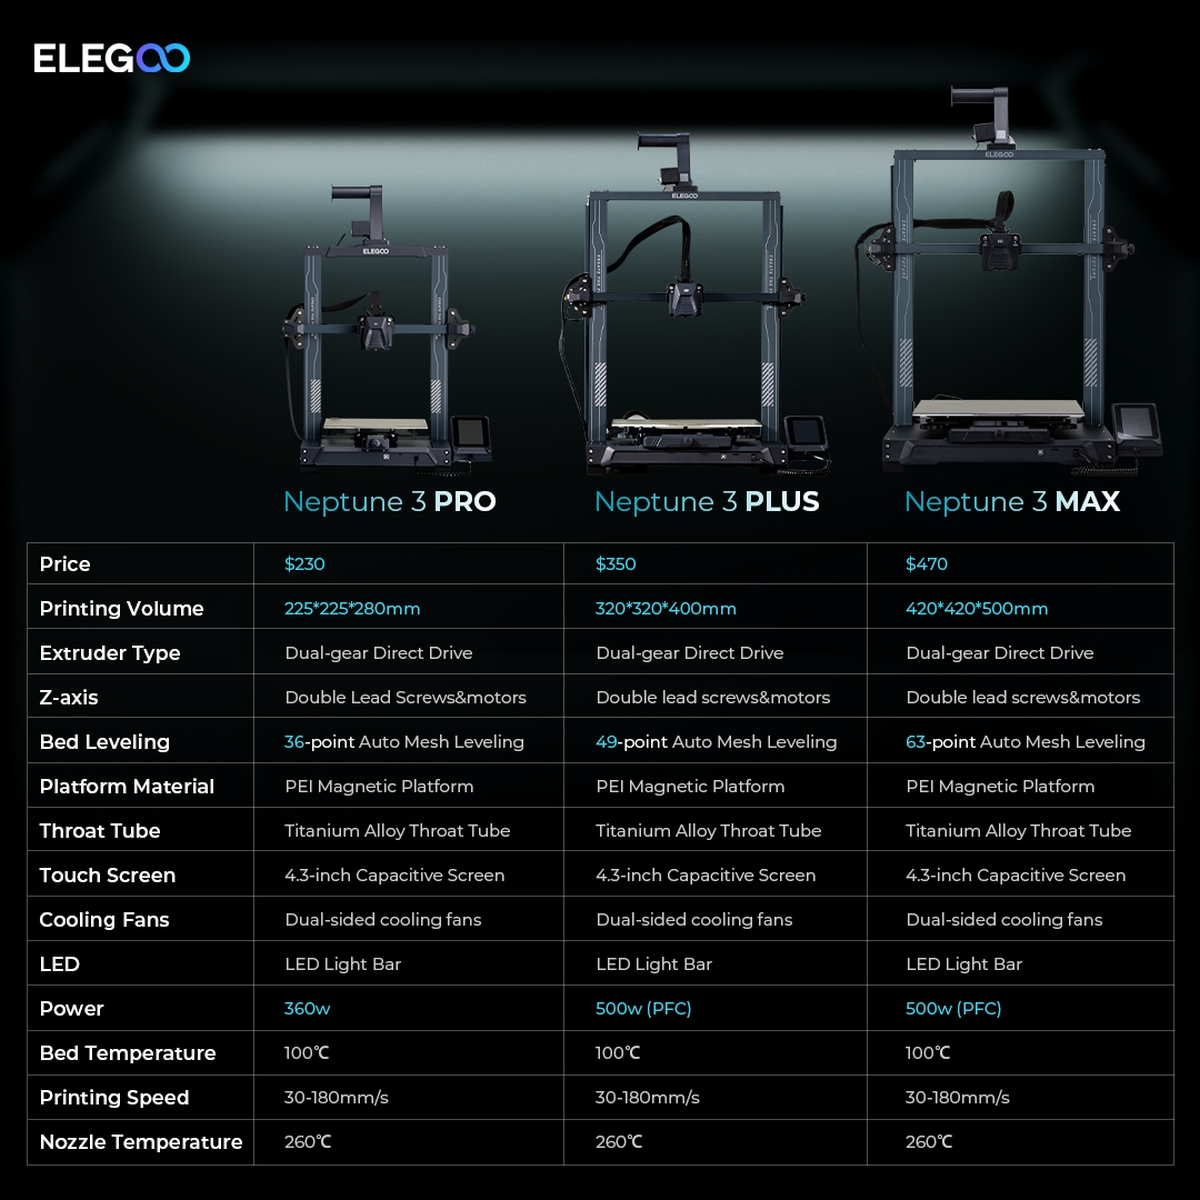
The ELEGOO Neptune 3 Pro is an auto-leveling FDM printer with a 225*225*280mm printing size. It has a PEI magnetic platform, LED light bar, and a host of other upgrades from the previous Neptune 2. It is currently available to order from the ELEGOO webstore for $230 USD.
- [Overview of Neptune 3 Pro] 225*225*280mm printing size can meet the needs of most users. With an STM32 motherboard, all axes of ELEGOO Neptune 3 Pro are driven by silent stepper motors for quieter and more precise movement during printing, which reduces the noise as low as 47-48dB. The easy-to-setup printer comes with the main components pre-assembled, as well as a complete tool kit for quick installation.
- [Dual-Gear Direct Extruder] The new dual-gear direct drive extruder is made of SUS303 high-quality stainless steel with a 3:1 reduction ratio and stronger extrusion force for smoother filament feeding and more stable & accurate printing, which greatly reduces nozzle clogging and under-extrusion issues, printing effect is better than Bowden extruder. Compatible with multiple filaments such as PLA, TPU, PETG, and ABS.
- [Nozzle Kit for Better Printing Effect] The nozzle kit contains a TC4 titanium alloy throat pipe, an aluminum alloy flat heat sink structure, and a brass nozzle. The widened aluminum heat sink paired with the front close-fitting efficient cooling fan for a better heat dissipation effect and lower the temperature of the throat pipe, thereby reducing the possibility of nozzle clogging. Fans on both sides of the print head ensure omnidirectional and rapid cooling of printed layers to improve the model details and overhang printing effect.
- [Smarter Printing Experience] Auto mesh bed leveling adopts a non-contact high precision sensor to automatically scan 36 (6×6) points of the hotbed and collect data in real-time, and then adjust the Z-axis height to compensate for any irregularities and unevenness of the printing platform. (Only applicable to metal printing platforms) Intelligent fan control: after printing, all fans will automatically stop working below 50℃ to extend fan lifespan, reduce noise, and save power. Smart resume printing: the printer will auto-pause when the filament runs out or breaks, and you can resume printing after a power outage.
- [More Stable Printing] The Z-axis with dual synchronized lead screws and dual-motor drive for more stable movement of the print head and higher printing accuracy, avoiding the printing deviation driven by a single Z-axis lead screw motor. The 4-wheel V-guide rail pulley is made of POM with more stable movement, low noise, wear resistance, and longer service life.
- [Ease of Use] PEI magnetic platform with a special coating and spring steel sheet for good adhesion and anti-warping, so that prints can be easily released or popped off by bending the print steel sheet. The 4.3-inch removable capacitive touch screen can be operated by hand-held or fixed on the base. Built-in print model preview function to preview the model image before printing and observe the printing progress. The 250W high-power hotbed can quickly heat up to 100ºC and start printing. The integrated LED light bar on the gantry can be operated by pressing the buttons on the screen to conveniently observe the model printing in a poor light environment.
Unboxing and Assembling the ELEGOO Neptune 3 Pro

Like all the ELEGOO printers, everything is packed very safely and securely to ensure that the machines arrive in good shape. Once you remove everything from the packing foam, this is what you have:

There’s a bit more assemble when it comes to an FDM printer than you get with an MSLA one. However, most of it involves using a hexkey wrench to attach the parts together, and then you plug the electronic components into the power supply. It’s a pretty easy process to go through following the instructions, and you should have your printer assembled and ready to go within about 10-15 minutes.
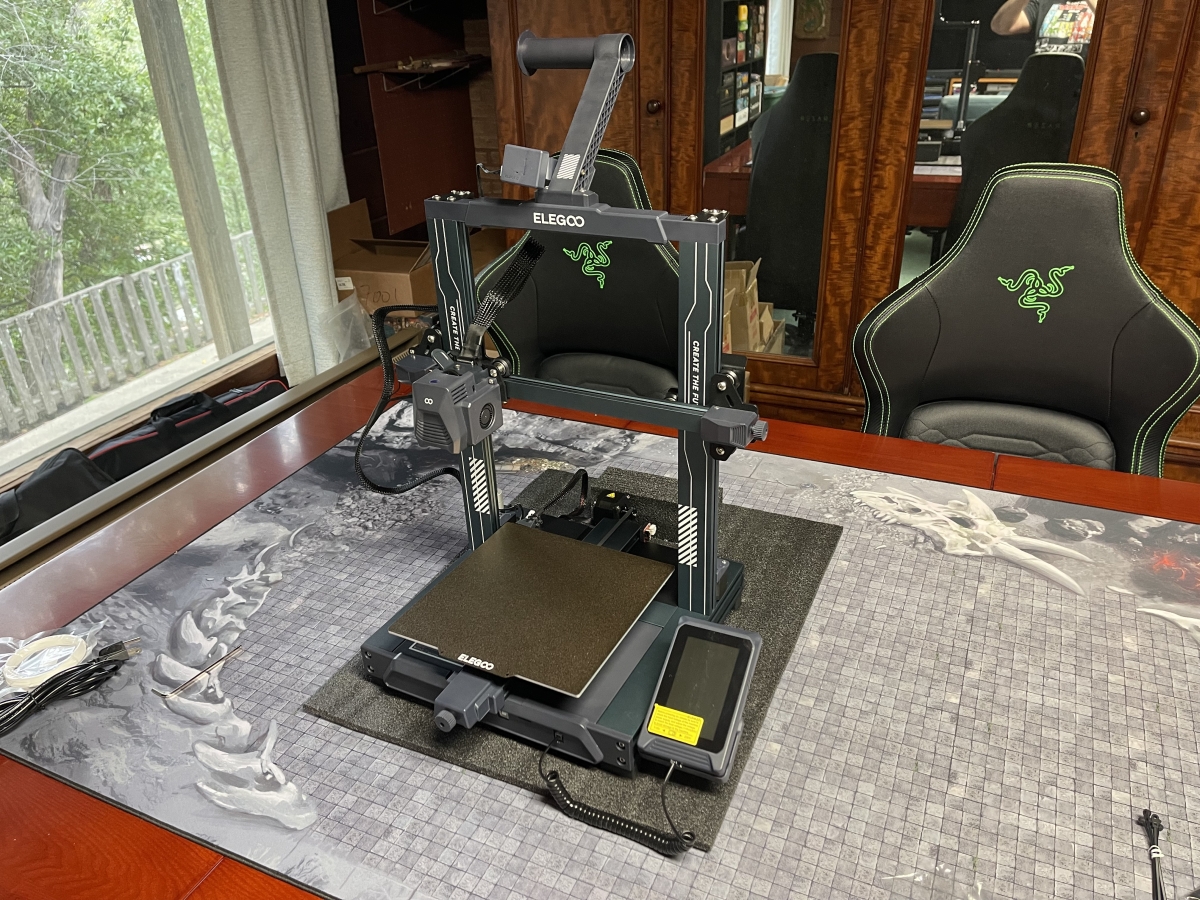
Click to view slideshow.And here’s the completed printer:
Adventures in 3D Printing With the ELEGOO Neptune 3 Pro
A significant upgrade over the previous Neptune series is the inclusion of 1-touch auto-leveling. This is a huge quality of life change. You basically just select it in the Neptune 3 Pro’s menu, the printer bed and nozzle heat up to the indicated level, and then the machine runs through a 36-point leveling process on the printer bed.

There is still some minor tweaking of the z-axis that you’ll need to undertake at the end of the auto-leveling, but that’s a pain-free process compared to what I had to go through leveling the Neptune 2.
After leveling the printer, you’ll feed the filament through the filament detection sensor, and then into the print head. Again, there’s a simple process you select in the Neptune 3 Pro menu to automatically load, or unload, filament.

In preparing your models to print on the Neptune 3 Pro, ELEGOO has included their proprietary version of the Cura slicing software. This makes it easy to get up and running with importing and slicing models, as you can just select the ELEGOO printer that you’ll be using and the program automatically loads the defaults for that particular printer.
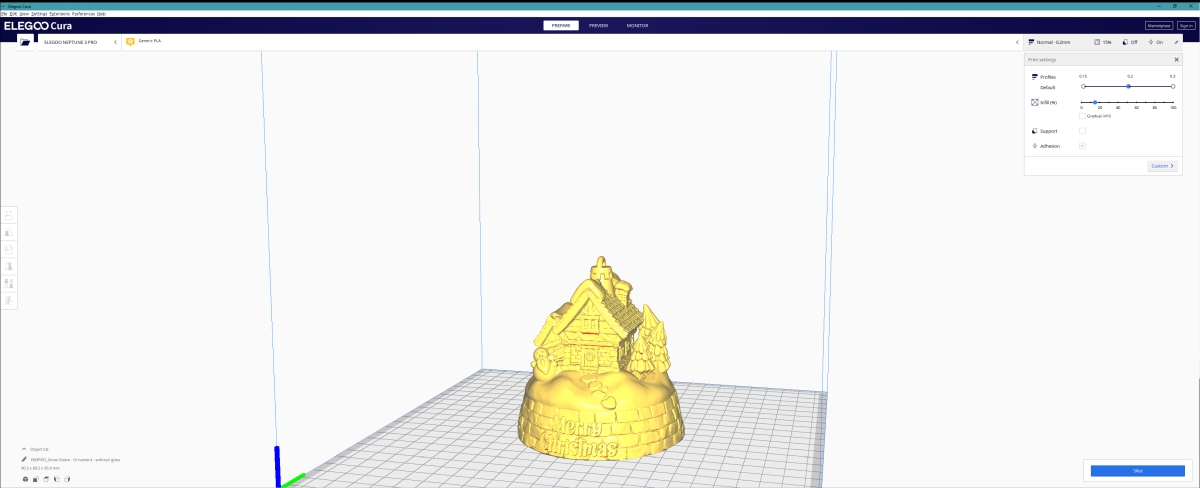
With the Cura software, you import an .stl file into the program, and then adjust elements like the scaling, the type of filament you’ll be using to print, and the speed of the print. When you have everything set, you click the “slice” button, and Cura generates a file called “gcode,” which is what you’ll use on the Neptune 3 Pro to physically print the file. Additionally, when you slice the model, the software will tell you how long it will take to print, and how much filament will be consumed during the print process.
I started out my printing journey with the ELEGOO Neptune 3 Pro by printing up the test file included on the micro SD card that comes with the printer. I used the default settings for the printer.
Click to view slideshow.The final product came out very nicely, and looked much smoother than when I had printed the same file on the Neptune 2.

Next, it being the season, I thought I would try printing a Christmas ornament that I had found online. After 8+ hours of printing, that one also came out very nicely.
Click to view slideshow.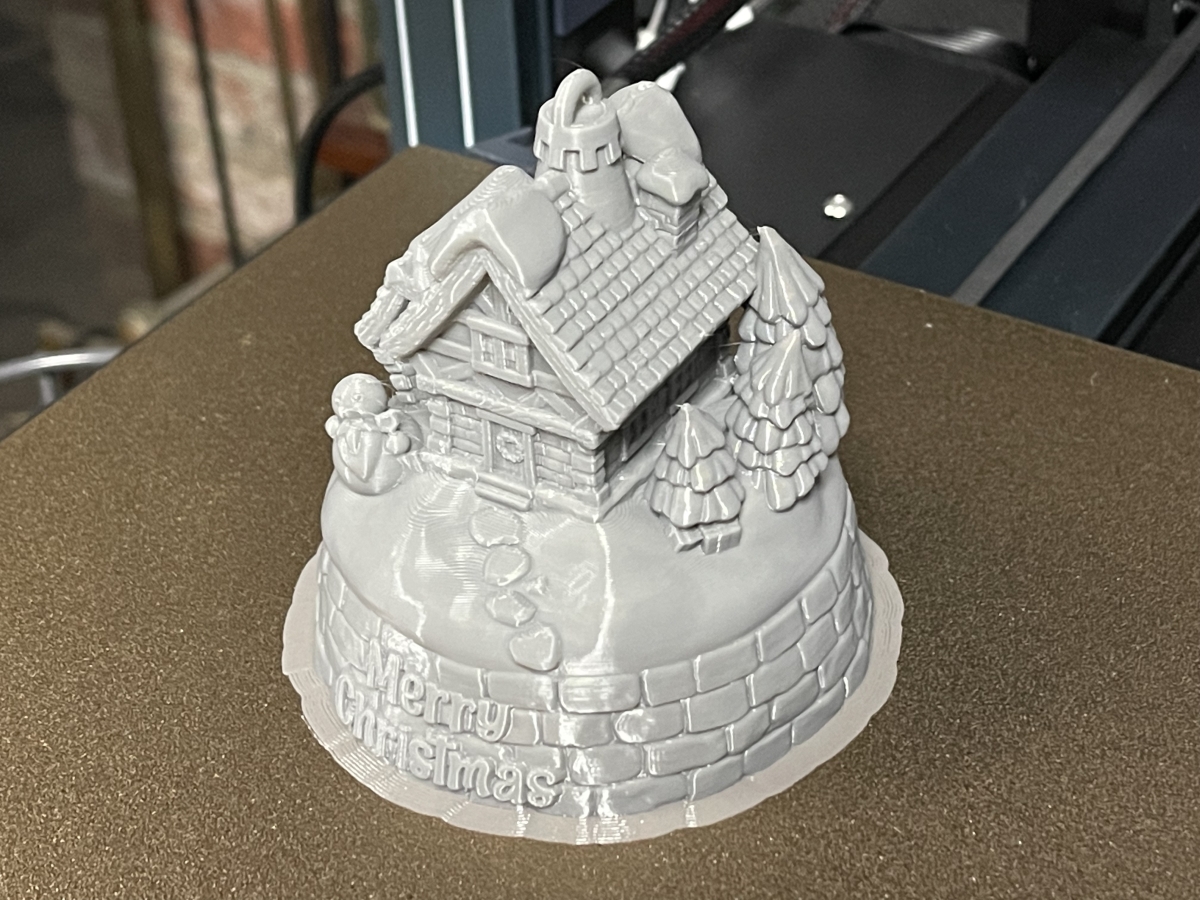
Here are some other views of the ornament, showing off the detail:
Click to view slideshow.Next, I undertook a rather large, multi-print project. As many of our readers know, I also review board games for GeekDad. I recently received a review copy of Lacrimosa, which has a lot of components, but nothing included to organize the game. After a quick search on Thingiverse, I found that someone had designed a very nice storage/organization solution for the game. I brought the files into Cura and organized them on the print plate, so I could print them all up in a minimum number of batches.
Click to view slideshow.Here are the completed organizers, alongside the board game itself:

Having done a dice tower in my Neptune 2 review, I decided to try another one for the Neptune 3 Pro. Once again, I turned to a file from a Kickstarter campaign I had backed from Fate’s End. However, I decided to try something a little different, with a color-changing silk filament from Eryone.
Click to view slideshow.83 hours and 46 minutes later, the dice tower was finished.

From a distance, the print looked great. But getting up a little closer, you can see that there is some layer shifting. There can be multiple causes for this with a print, but in this case, the culprit was having a print speed that was too fast. Yes, 83+ hours is hardly “fast.” However, with the silk PLA, the nature of the material requires a slower print speed. I had foolishly gone along with one person’s review on Amazon saying that they didn’t need to change the print speed, rather than the general recommendations for silk-type PLA filament. I will be printing another dice tower with the same filament, but this time reducing the speed to ensure a nicer print.
Click to view slideshow.Finally, I had to stop printing at some point (at least temporarily) and start writing the review. I finished off with a few K-Pop items that I had also found on Thingiverse, for my girlfriend’s daughter:
Click to view slideshow.ELEGOO Neptune 3 Pro: The Verdict
When I reviewed the ELEGOO Neptune 2 in April of last year, I was impressed with what a very inexpensive FDM 3D printer could do. Now, here comes the Neptune 3 Pro, at $70 more in price.
Thankfully, the cost increase isn’t just inflation. The Neptune 3 Pro is the better printer, in both features and performance. Some of the features I really liked about the ELEGOO Neptune 3 Pro include:
- PEI magnetic print plate. Besides being able to remove the steel plate and pop off prints easily, I also found that filament adheres excellently to the surface of the plate.
- The filament is much easier to feed into the print head of the Neptune 3 Pro than it was on the Neptune 2.
- Auto-leveling. Seriously, this upgrade alone is worth the price of admission for this model.
Things I was neutral on (but may be important to others):
- LED light bar. I didn’t find myself using it during prints, but if you’re in a low-light situation, I suppose it can be useful. One of those features that’s there if you need it.
- Removable touch screen. I never felt I needed to remove the screen, and it just as well may have been attached to the printer. Though, if the touch screen ever breaks, replacing it will be much easier than the built-in display on the Neptune 2.
- The print bed size. It’s a very small improvement over the Neptune 2. However, ELEGOO has two other Neptune 3-family printers, if you’re looking for larger print volume.

And what I didn’t like:
- The instructions could still be a little clearer. While overall the Neptune 3 Pro is a beginner-friendly printer, the assembly can be unclear at points, especially regarding hooking up the electronics.
- The Micro SD card. It can be a pain dealing with the USB adapter for the card when transferring files from my computer. I find it odd that ELEGOO uses USB sticks for all of their MSLA printers, and Micro SD for their FDM printers.
A friend and fellow 3D printer enthusiast asked me this about the Neptune 3 Pro: “how idiot-proof is it?” I laughed at the question, but also understood what he meant by it. As I always state with my ELEGOO reviews, 3D printing is a hobby. As such, there will be tweaking and tuning you’ll do constantly with any printer to get consistently good results. But in the case of the ELEGOO Neptune 3 Pro, this is a great “out of the box” 3D printing experience. After a quick assembly, I had the printer leveled, loaded, and printing away within minutes, with very good results. ELEGOO has done it again, turning out a great printer at a consumer-friendly price, and is a strong recommendation from me if you’re looking for an FDM 3D printer.
For more information on the ELEGOO Neptune 3 Pro, head to the ELEGOO website.
Elegoo sent me a unit for evaluation, but had no input into this review. As an Amazon affiliate, I may earn a small commission on qualified purchases.
Click through to read all of "Adventures in 3D Printing: The ELEGOO Neptune 3 Pro" at GeekDad.If you value content from GeekDad, please support us via Patreon or use this link to shop at Amazon. Thanks!