

Back in 2017, Larry Harris, creator of Axis and Allies, partnered with Thomas Gale and Nightingale Games to bring his magnum opus to Kickstarter: War Room, a deluxe global World War II game. War Room shipped in 2019 and was met with critical acclaim, with the first edition selling out. Now they’re back on Kickstarter with a second edition, which looks to improve on the original while still offering the same fundamental experience as the first edition. Nightingale Games sent me one of their last copies of the first edition of War Room as well as the Jumbo Pack Expansion and Nano Expansion to check out.
What Is War Room?
War Room is a wargame for 2-6 players, ages 14 and up, and takes about 120-480 minutes to play for the 1st edition. For the 2nd edition, games will last 1-10+ hours, depending on the scope of the scenario, the number of players, and whether you are playing with a turn timer and/or the quick battle rules. It combines strategic maneuvering, economics, and custom dice-based combat.
War Room is a big game that for most will take up an entire day of gaming. Much like fans of Twilight Imperium, players should be aware of the time commitment. War Room 2nd edition is currently seeking funding on Kickstarter, with a pledge level of $137 for a copy of the game. This is a significant savings over the $200 retail price post-Kickstarter. It’s also worth noting that Nightingale Games is making the 2nd edition less expensive than the 1st. The original cost for War Room on Kickstarter was $149, with a retail price of $240. They are also offering a $5 pledge tier to contribute to the further development and improvement of the digital version of War Room on Tabletop Simulator and Tabletopia.
War Room was designed by Larry Harris and published by Nightingale Games, with illustrations by Thomas Gale.
New to Kickstarter? Check out our crowdfunding primer.

War Room Components
Note: My review is based on the 1st edition. There will be a few component changes made for the 2nd edition, which are detailed here. However, the majority of War Room’s components will be unchanged from 1st edition.
Here’s what comes in the 1st Edition War Room box:
- 4 Unit Storage Trays
- 1 Common Token Storage Tray
- 7 Nation Storage Trays
- 7 Resource Charts
- 28 Color-Coded Pegs
- 1 World Map
- 1 Morale Board
- 7 Pads of Operations and Production Charts
- 2 Battle Status Boards
- 131 Territory Cards
- 11 Card Holders
- 2 Reference Mats
- 10 Custom Dice
- 7 Capital Stars
- 137 National Flag Tokens
- 32 British Command Tokens
- 29 United States Command Tokens
- 21 Soviet Union Command Tokens
- 8 China Command Tokens
- 39 Imperial Japan Command Tokens
- 29 Germany Command Tokens
- 17 Italy Command Tokens
- 150 Infantry Tokens
- 80 Artillery Tokens
- 60 Armor Tokens
- 80 Fighter Tokens
- 25 Bomber Tokens
- 15 Carrier Fighter Tokens
- 25 Submarine Tokens
- 35 Cruiser Tokens
- 15 Aircraft Carrier Tokens
- 15 Battleship Tokens
- 15 Force Multiplier Tokens
- 30 Hotspot Markers
- 20 Medals/Civilian Goods Tokens
- 25 Bomb/Industry Tokens
- 20 Arrow Tags
- 20 Stress Tokens
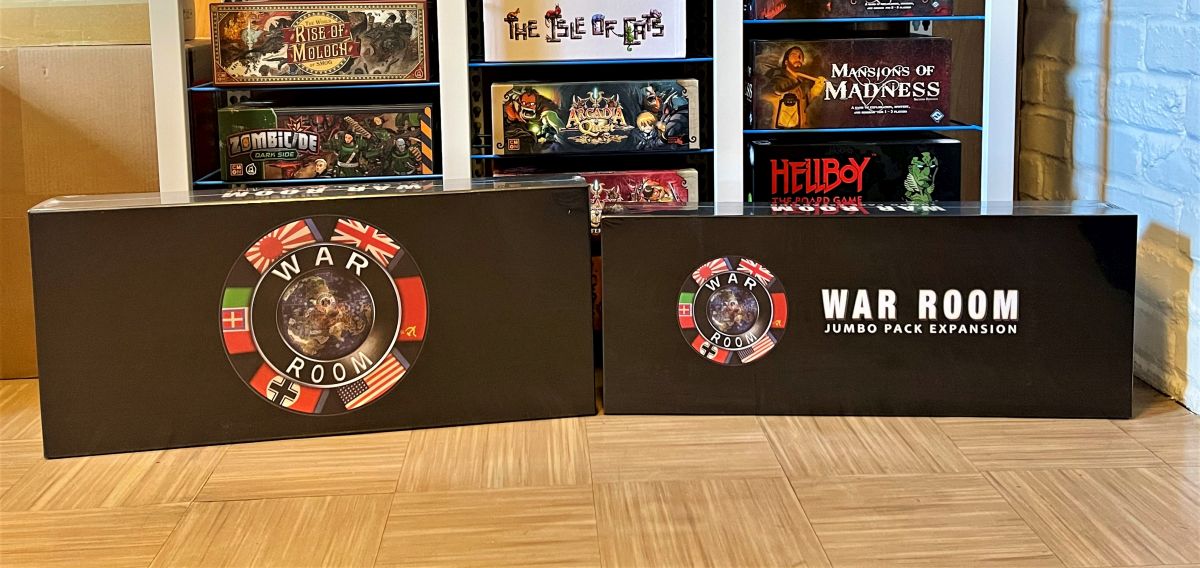
First off, let’s deal with the elephant in the room. War Room is a big game. How big, you ask? Here are the boxes for both the game and the Jumbo Pack Expansion:
To give you another example, here’s a different angle on all the game components:
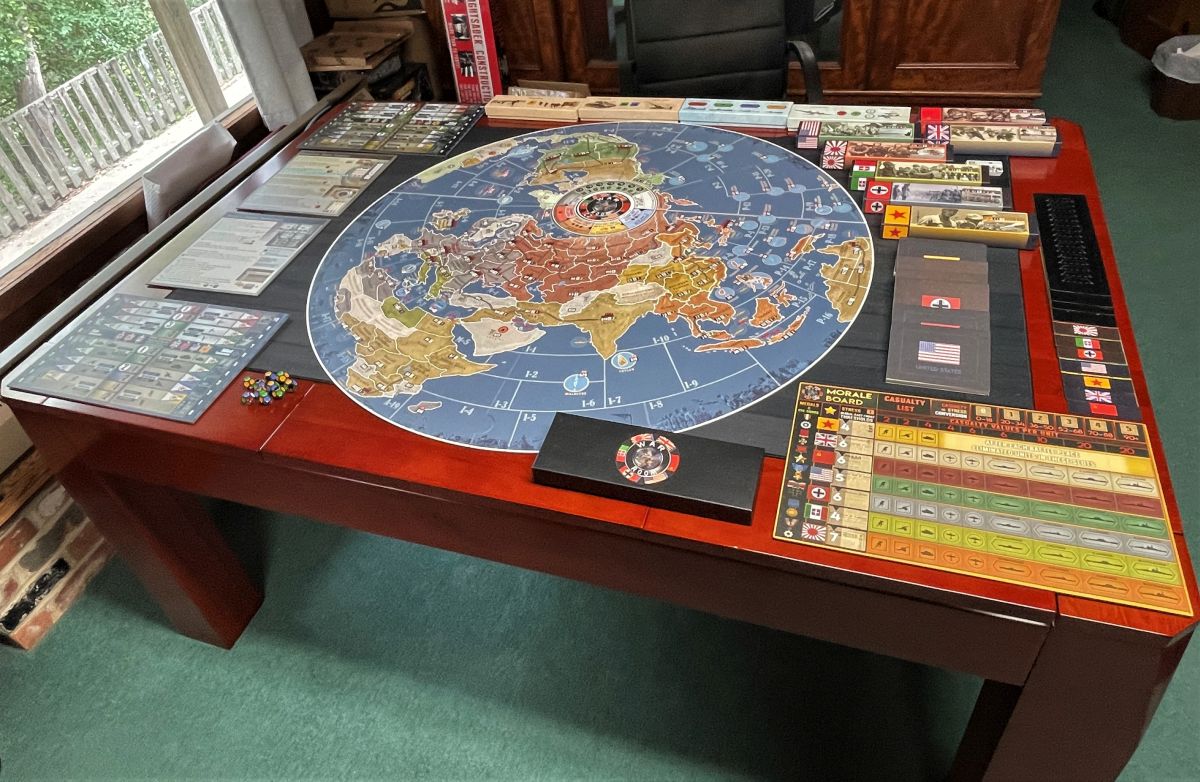
That’s everything laid out on a 6’x4′ table. I texted that photo to the president of Game Theory Tables, joking, “I’m going to need a bigger game table.” But it does give you a good idea of the sheer scale of the components.
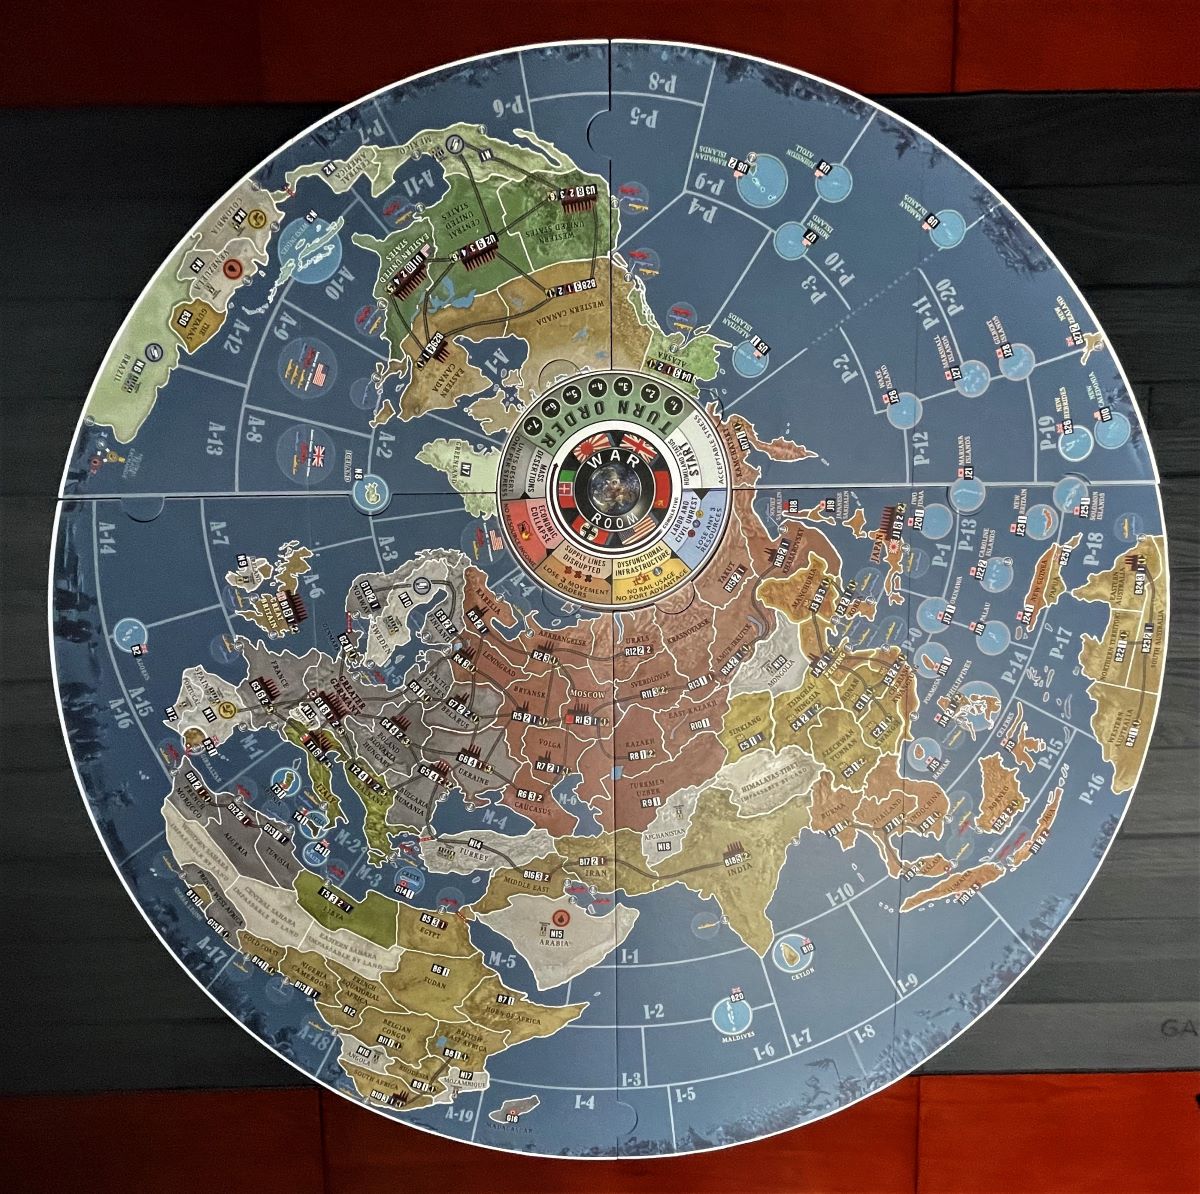
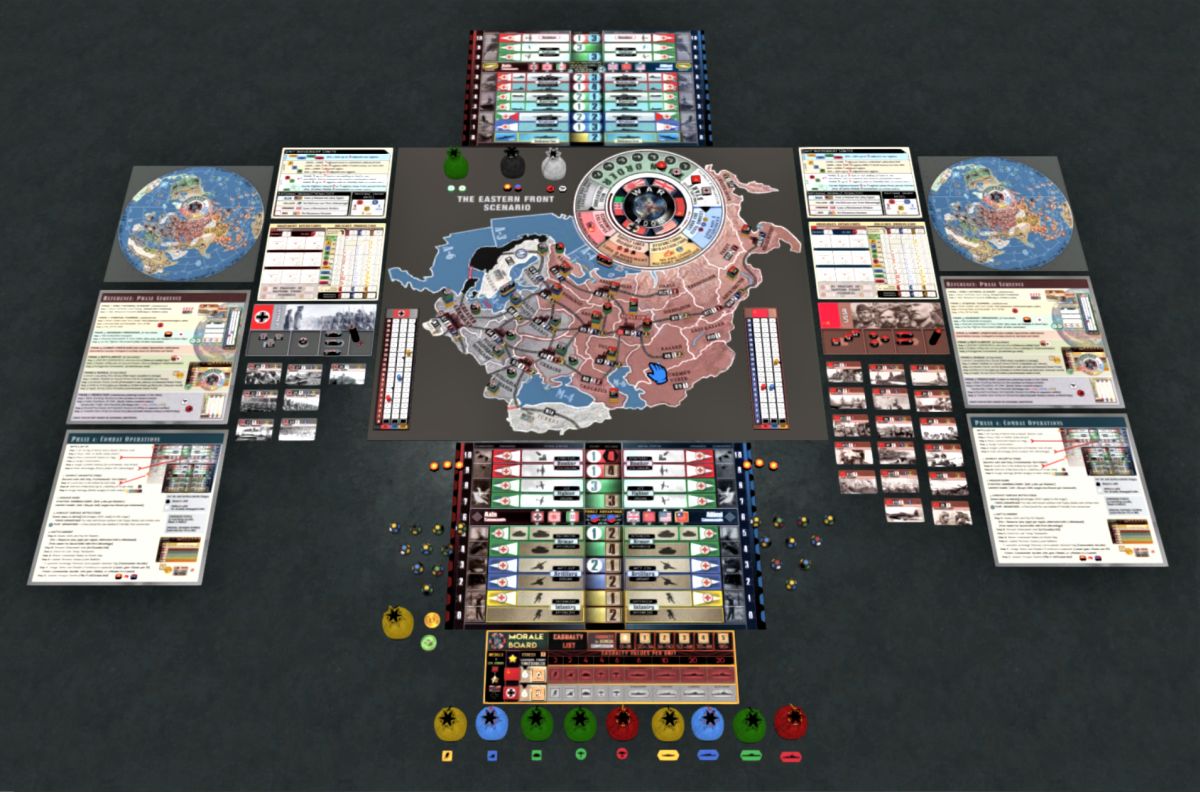
The multi-piece folding game board assembles easily into a 42″ diameter map of the world, with Turn Order and Homeland Status trackers located at the North Pole. It’s made of thick cardboard, with a reinforced black back. I suspect it will hold up to plenty of games. There’s a lot of information on the map that may seem overwhelming to the first-time observer, but it’s all very easy to read once you’ve learned the rules.
There are a few additional boards used in the game. In the 1st edition, they’re made of thick cardboard, but with the 2nd edition, they’re planning on using thinner stock to bring down the weight and cost. There is a possibility that 2nd edition boards may get upgraded to 1st edition thickness if the Kickstarter campaign performs well.
The one board that will change the most from the 2nd edition is the 11″x17″ Morale Board. In the 1st edition, you add Stress Tokens to the board, but in the 2nd edition, you’ll instead have a stress track for each country. The Morale Board is double-sided; one side has stress values for the Global War and Eastern Front scenarios, while the other is for the War in Europe and War in the Pacific scenarios. Here is the board from the 1st edition:

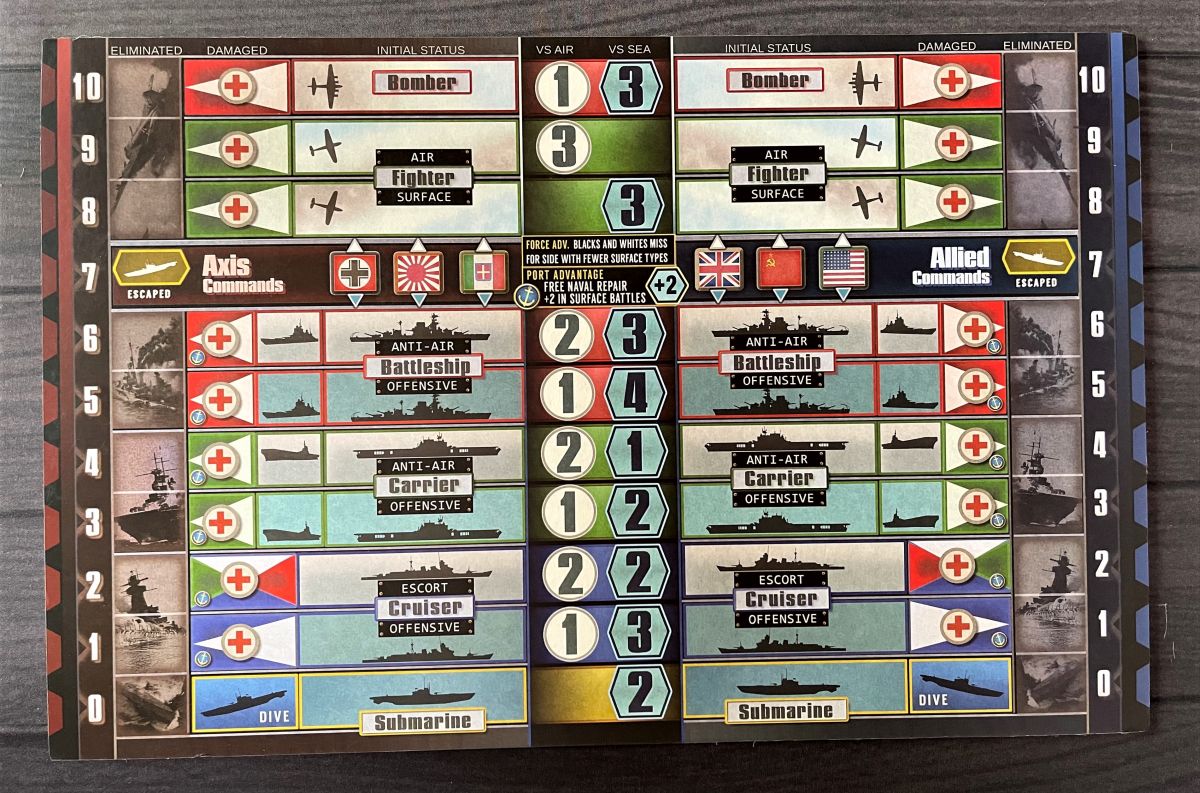
There are also two double-sided 11″x17″ Battle Boards. One side is for land/air battles, and the other side is for sea/air battles. Again, these are currently thick cardboard, but will be thinner and lighter in the 2nd edition.

In addition to these boards, there are also two very helpful double-sided Reference Mats. One mat has a breakdown of the phases of the game, while the other summarizes the steps taken during Combat Operations. The reverse side of both boards is a smaller image of the World Map so that allies in the game can use it to secretly plot their maneuvers.
Each playable nation in the game has its own Nation Storage Tray, which holds its Command Tokens, Resource Chart, Territory Cards, and National Flag Tokens. Each nation’s Storage Tray is unique, showing an illustration of WWII soldiers from that country, and that nation’s flag from the period. Plastic command tokens and cardboard National Flag Tokens match the color of the box. Here is the Imperial Japan tray and components:
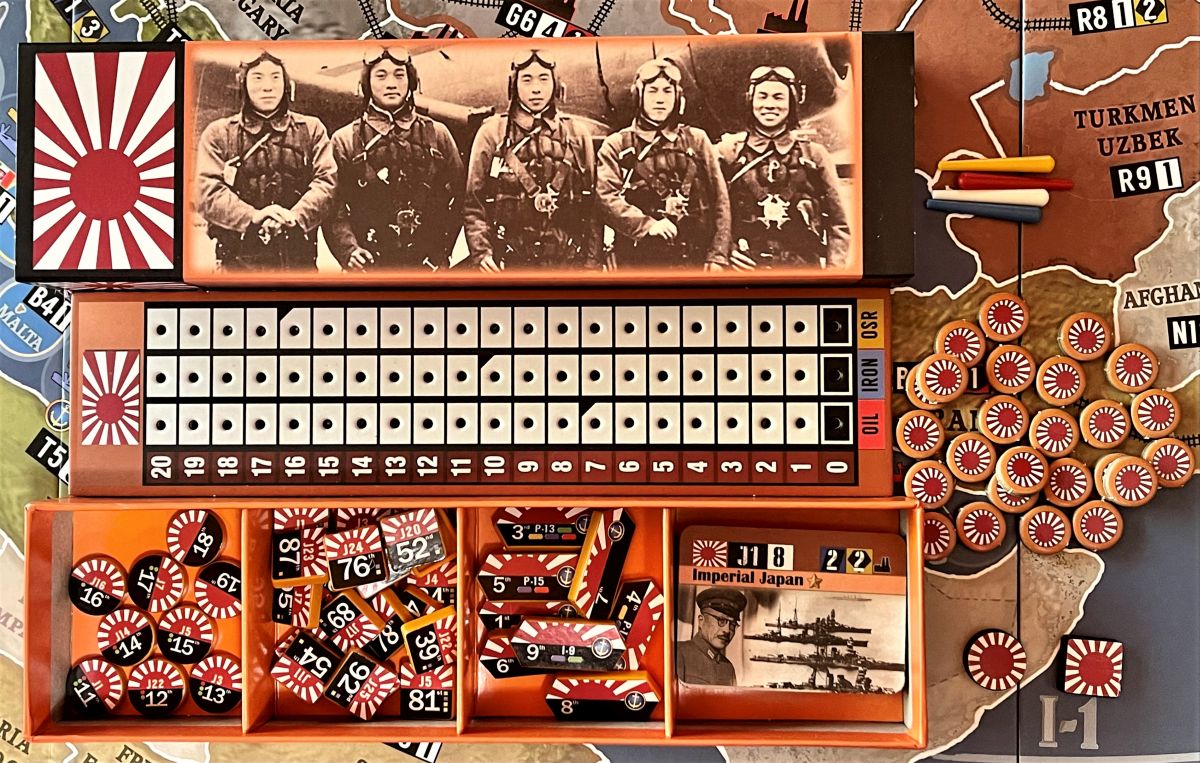
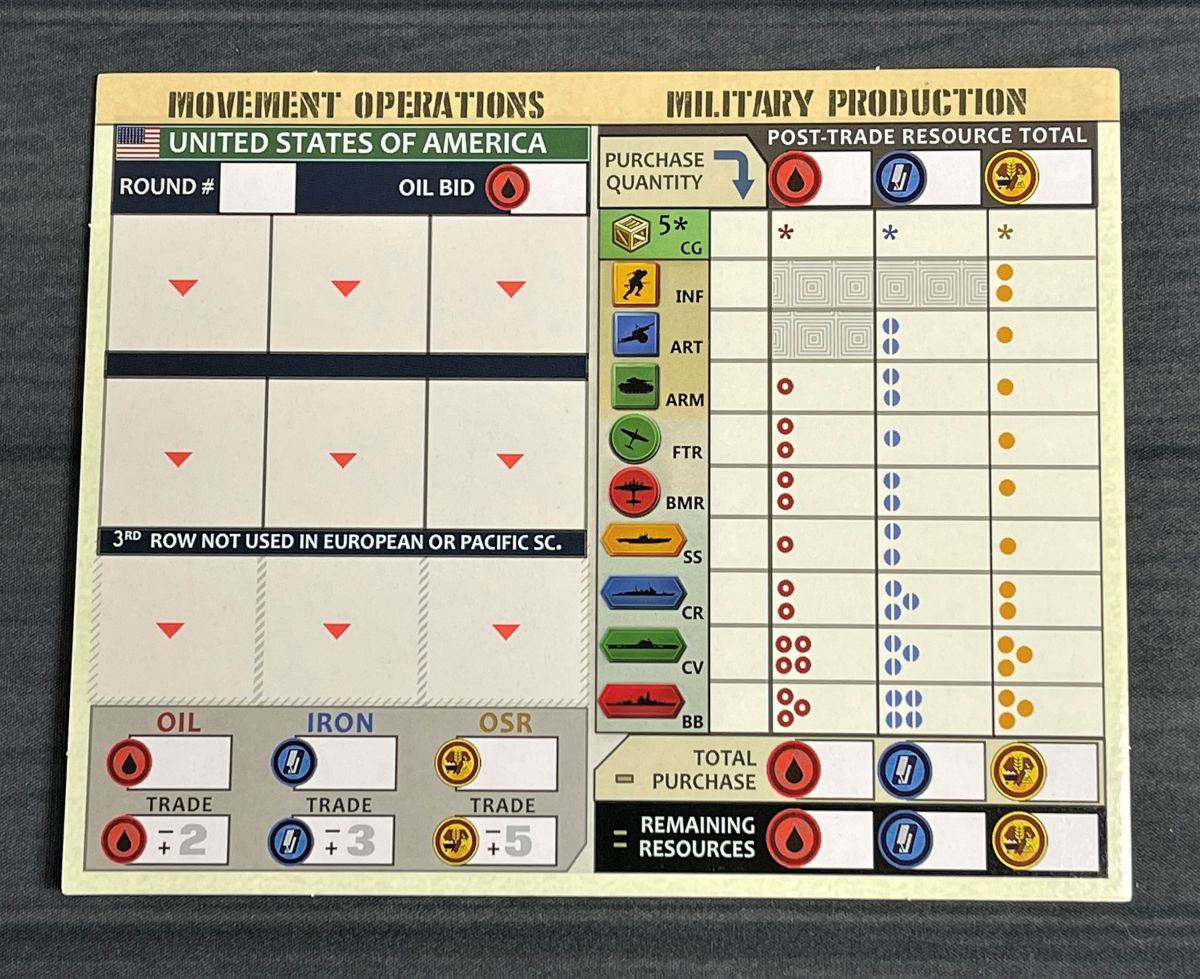
Each nation also has its own Operations and Productions Chart pad. While the covers show each individual nation’s name and map, the interior of each pad is the same. 1st edition O&P Charts have 50 double-sided sheets; 2nd edition Charts will have 30 sheets. These Charts are used to write unit commands, bid for turn order, and produce units.

There are several common units used by all nations. There are hundreds of plastic Land, Naval, and Air Tokens which are placed under each nation’s Command Tokens:

All of those tokens interlock as they stack so that you can create Command Stacks that will easily move across the map. In the 2nd edition, those boxes will be eliminated, and instead, there will be a larger Common Unit Box that will have enough space for the contents of all the Unit Storage Trays. There is also a Common Token Storage Tray, which is shown below:

War Room uses custom dice for combat resolution, where the colors on the dice faces match the colors of the Unit Tokens. Each matching color represents a wound on the corresponding enemy’s unit. A black result allows the attacker to choose any color for the result, while a white will only put another damage on an already damaged unit.

I want to draw your attention to another feature of these dice: each colored facing has a different number of notches molded into them. This is to help someone with color blindness to read the results of their dice rolls. A terrific inclusion by Nightingale Games.
All of the components are of fantastic quality, using thick cardboard, wood, and plastic along with a strong graphic design to create a singular table presence. But that’s not all that’s available for playing War Room.
War Room Nano Expansion Components
A very small optional expansion that will now be included with the main game in the 2nd edition, the Nano Expansion contains 20 double-sided Submarine Tokens, showing either dived or casualty states. The use of these tokens alters the way that naval warfare affects national morale.

War Room Jumbo Pack Expansion Components

The Jumbo Pack Expansion contains the following:
- 47″ Diameter Neoprene Map
- 6 Command Staves
- 10 Extra Custom Dice
- Dice Bag With Logo
- 2 Plastic Dice Roller Cups
- 6 Drink Coasters With Logo
- 7 Double-Sided Dry Erase O&P Boards
Of arguably most utility are the dry erase O&P Boards. There is one for each nation, and they are roughly a third larger than the paper O&P Charts.

Highest in the “cool” factor are the 26″ long wooden Command Staves. With these, you can move your Command Stacks around the board like the great military leaders of yore.

If you have the tablespace, the neoprene World Map gives you a little more breathing room for maneuvering units in some of the smaller countries and islands on the map. Things can get pretty crowded in hotspots on the map, so it never hurts to have a larger playing surface. Nightingale will be offering a neoprene World Map in the Kickstarter, which will ship rolled up in a tube.
The Jumbo Expansion won’t be offered during the Kickstarter, but there are still copies available on the Nightingale webstore. Additionally, some of the pieces found in the Jumbo Expansion will be available for purchase separately, as well as other supplements not pictured here.
How to Play War Room
You can download a copy of the rulebook here. There is also an excellent “how to play” video series from Harsh Rules. You can watch the first video here:
Additionally, you can try out the game for yourself online. The 2-Player Eastern Front scenario is available on Tabletopia, while all player counts and scenarios are available to play on Tabletop Simulator.
The Goal
The goal of War Room is to gain control of the territories specified for the particular scenario you are playing, depending on whether you are playing Axis or Allies. For example, in the War in Europe scenario, the Allies(British Commonwealth, Soviet Union, United States) will all win if they control Greater Germany.
Setup
Place the World Map in reach of all the players. The Battle Board and Morale Board are placed next to each other. All Common Tokens, dice, and Unit Storage should be within reach of all players.
Choose a scenario to play, and then each player decides what nation(s) they want to play. Each player takes the O&P Chart pad and Nation Storage Tray matching the nation(s) they are playing, as well as the matching Card Holders. Colored pegs are placed into the Resource Charts matching the colors of the resources.
Each player places their square Jumbo National Flag on the Start Zone of the Homeland Status Track, and their round Jumbo National Flag on the Turn Order Track.
Take the Territory Cards for your nation(s) indicated for the particular scenario, and place them into your Card Holder for easy reference.

Place Command Tokens in regions, as indicated on the reverse(“embattled”) side of the Territory Cards, adding the appropriate military Units under the Command Tokens to create “Command Stacks.” Alternately, you can do a “Rapid Setup” where you place just the Command Tokens initially, only adding the Units to create the Command Stack once that Command Token is acted upon during the game.
Choose one player to be the Scheduling Officer in charge of keeping the game moving along, and then you are ready to begin.

Gameplay
The game is played in rounds, with each round having 7 Phases. I will just be summarizing the basics of how each phase works to give you a feel for how War Room plays. If you’re interested in all the fine details, then definitely check out the rulebook and/or the “how to play” videos linked above.
Phase 1: Direct National Economy
In this phase, each player will simultaneously earn income from the territories they control. First, check to see if any of your territories are embattled (ie, there are opposing forces in the territory). There should already be an Embattled Marker placed there from a previous round. If you hadn’t before, flip any Territory Cards for embattled regions to the “embattled” side, as indicated by the red and white stripes at the top of the card. Embattled territories often produce less resources.
Next, count up the total number of each resource(Oil, Iron, OSR) and move the pegs on the Resource Chart to the matching values.
Phase 2: Strategic Planning
Players will simultaneously and secretly write commands for units onto their O&P Chart. Players controlling nations allied with each other are welcome to discuss strategy.

You write the Unit Command number at the top, and below the arrow is the region where you’re planning on moving the unit. A few notes on movement:
- Land Commands move one adjacent space unless moved by rail. Rail movement is as far as you want along a railroad line as long as that line doesn’t enter enemy territory.
- Land Commands can be moved onto ships and transported across the sea.
- Air Commands may move 1 or 2 spaces over land or sea.
- Naval Commands may move 1 or 2 sea regions.
Land or Naval Commands are pinned if they try to exit a region where there are enemy units. If pinned, that command must leave behind a number of units equal to the number of enemy units in the region before moving the rest of the units (reorganized under a new Command Token) out of that region.
Finally, you will secretly bid oil for turn order. Once everyone has finished writing their bids, everyone reveals them and the highest bid gets the first choice for turn order, the next highest second choice, and so on. Ties are randomly determined.
Phase 3: Movement Operations
First, flip all Embattled Hotspot markers to the active side.
Then, in the turn order established in Phase 2, each player will resolve all their written orders, going from left to right on all three rows on the O&P Chart. Players may choose to cancel any orders, and any moves that would turn out to be illegal are also canceled.
Hotspots are added to regions where new combats will take place, and Arrow Tags are placed next to any Air Commands that move during this phase. Any Units moving out of a region with enemy Units must observe pinning rules.
Finally, if any orders were given to Naval Commands that included Carriers, those Carriers can launch Fighters.
Phase 4: Combat Operations
While not particularly difficult to understand, conflict is the meat of War Room and the Harsh Rules series has a video devoted just to the combat operations phase. Each nation will, in turn order, choose a Hotspot to resolve. Here are the basic steps you will go through when resolving a combat.

Battle Setup
- Flip the Battle Status Board to the correct facing for a land or sea battle.
- Place all Units on the Battle Status Board.
- Place Command Tokens on the matching Nation Flags.
- If more than one allied nation is involved in the combat, one nation will act as Commander for the battle.
- Assign Battle Stances- most Units will have two different stances. For example, if Infantry chooses a defensive stance, it will roll 1 die during combat, but can also take an extra point of damage before being destroyed. if Infantry takes the offensive stance, it rolls 2 dice during combat, but it only takes one hit to destroy an Infantry unit.
- Make a note if one side has Force advantage or Port advantage for the combat. The side that doesn’t have Force advantage will roll misses on black and white die results. Port Advantage grants two extra dice for a Naval Surface Battle fought next to a friendly port.
Resolve Air Battle Stage
In turn order:
- Count dice to be rolled by each side, using Embattled Tokens to mark the number on the side of the Battle Status Board.
- Roll dice in batches of 10.
- Assign Damage, based on the colors rolled.
Resolve Raids
- Strategic Bombing Raids: Roll 4 dice per Bomber. These Raids can damage Units, Infrastructure, or resources depending on the results rolled.
- Convoy Raids: Roll 1 die per unit in the attacking Command(s). Each matching die result will sink all transports of that color. For each transport sunk, that nation will lose one resource of matching color.
Resolve Surface Battle Stage
Same steps as the Air Battle Stage.

Combat Debrief
- Wounded Units may be repaired by paying 1 of any Resource per Unit. Any Units not repaired are eliminated. Naval Units at a friendly port get free repairs.
- Remove Eliminated Units to the Casualty List on the Morale Board.
- Check for lost Troop Transports.
- Return remaining Command Stacks to the World Map.
- For captured Territories, exchange Territory Cards and update the National Flag. Capturing a Territory awards the victor 1 Medal, or 3 Medals if it’s a capital. The loser gains Stress Tokens equal to the Strategic Value of the Territory.
- If the region is still Embattled, flip the Hotspot marker to the Embattled side. If one or both sides were eliminated, remove the Hotspot marker.
Note: rules for an optional “Quick Battle” system are being developed for 2nd Edition, for those that would like combat to play out faster.
Phase 5: Refit & Deploy
First, land Air Commands by moving them 1-2 spaces into friendly territory. Any Air Commands unable to land in friendly territory are destroyed. Remove the Arrow Tag once moved.
Then, any of the Units that were built in Phase 7 of the previous round are deployed. Remove the Industry tokens. These Units may now be deployed under new Commands or merged with other Commands in the same Territory. You may also reorganize any of your Commands at this point, combining Units to create Command Stacks no higher than 8 Units high.
Phase 6: Morale
In turn order, each nation will take the following steps:
- Convert casualties into Stress Tokens, based on the values shown on the Casualty List. You may submit Medals or Consumer Goods to cancel stress. Casualties are then returned to their corresponding Unit Storage Trays.
- Evaluate the Stress Levels. If a threshold has been met, advance on the Homeland Status Wheel.
- Optionally give up a combined total of Medals or Consumer Goods equal to your nation’s Stress Threshold to go back 1 zone on the Homeland Status Wheel. This may only be done once per round.
- Apply any of the Stress Zone Penalties as shown on the Homeland Status Wheel. Stress Zone Penalties are cumulative.
Phase 7: Production
This phase is done simultaneously, but then the orders are verified by opponents in turn order.
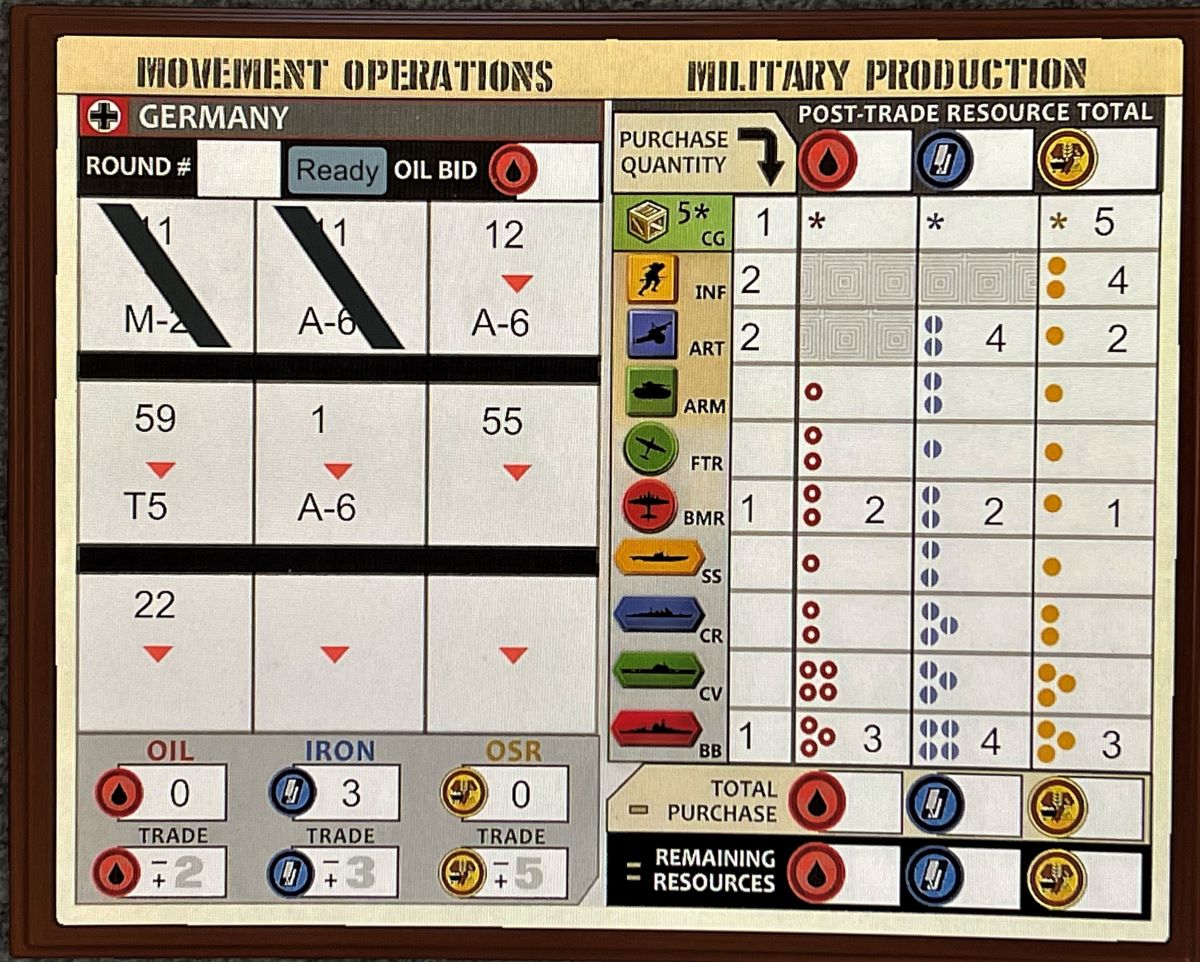
- Mark the starting resources on the O&P Chart.
- Note purchases. The O&P Chart shows which resources, and how many, each Unit costs to build.
- Reveal purchases and update resources, after an opponent verifies that the numbers are correct.
- Transfer new Units to Industries, placing them under an Industry Token on the World Map.
Finally, check for victory based on scenario conditions. If victory has yet to be achieved, start a new round.
Game End
The game ends when the scenario win conditions are met by either the Allies or Axis forces.
Why You Should Play War Room
For the average board game player, mention the word “wargame” to them, and their eyes will glaze over. If they’re of a certain age, they’ll picture an old Avalon Hill game like Advanced Squad Leader, with its hexagonal board, hundreds of pages of charts and rules, and countless tiny cardboard chits crammed with numbers and symbols. Games so granular, that gameplay could continue for days or even weeks.
War Room is not one of those games.
That’s not to say that it’s quick to play. Even if you know the rules well, War Room will eat up a considerable chunk of your time. But, as opposed to those aforementioned Avalon Hill games, or even many of the modern wargames currently on the market, War Room is fairly easy to learn. Yes, there are a lot of steps in the gameplay, as you can see in the “how to play” section above. But each step is broken down clearly for you, both in the rulebook and the reference mats. I found I could teach the game to others fairly quickly. I gave an overview of gameplay concepts and then taught as we played, going step by step through the phases of the game. In an effort to make the game even more accessible, Nightingale Games is working on a quickstart guide for the 2nd edition, to help gamers jump right into playing.

War Room is epic in scope, but accessible to the everyday board gamer. Each nation starts out with different territories and resources, but otherwise play fundamentally the same. Rather than getting lost in the weeds of minutiae, War Room presents streamlined rules that simplify the economics, combat, and wartime industry in order to facilitate play and allow players to focus on their strategies and have fun.
And everyone that I’ve introduced War Room to so far has really enjoyed their time with the game, myself included. I’ve played with everyone from fans of casual games up to one friend who’s a reasonably hardcore wargamer. As it turns out, all of them had a good time and wanted to play more. And with four different scenarios, and the strategic challenges inherent in playing the different nations, there’s plenty of replayability in the box.
War Room isn’t a game for everyone. Someone will inevitably have to play the Germans, a prospect not entirely appealing to many. It’s also a long game that demands a LOT of space on both your shelf and your table. But, for those that don’t have any problems with those issues, you’ll find War Room to be a fantastic addition to your game library. Now that it’s safe to start playing games in person again, I’m looking forward to gathering some of my gamer buddies and sitting down with the physical game for a whole day of ordering pizzas, drinking, and replaying the conflicts of WWII as armchair generals.
For more information or to make a pledge, visit the War Room: A Larry Harris Game 2nd Edition Kickstarter page!
Click here to see all our tabletop game reviews.
![]() To subscribe to GeekDad’s tabletop gaming coverage, please copy this link and add it to your RSS reader.
To subscribe to GeekDad’s tabletop gaming coverage, please copy this link and add it to your RSS reader.
Disclosure: GeekDad received a copy of this game for review purposes.

Click through to read all of "Kickstarter Tabletop Alert: (Possibly)Change the Outcome of WWII With ‘War Room: A Larry Harris Game’ 2nd Edition" at GeekDad.If you value content from GeekDad, please support us via Patreon or use this link to shop at Amazon. Thanks!